Tuesday, April 23, 2013

How to Find Free Patterns

So if you didn't know the little turquoise "B" to the right of my blog is a link to my Burdastyle profile. If you love to sew clothing this is a great website to meet others with the same passion.  Today I want to discuss one of the great things Burdastyle.com offers: FREE PATTERNS (yes FREE..just click the free box when searching for patterns)


This is the first dress I have made using a free Burdstyle pattern.  It's the lace-strapless-dress. Ayelet over at The Graceful Rose has a great tutorial on how to use a PDF pattern.  Follow this link: here.

 Here's a really quick blurb about what changes I made to the dress.
I used the medium pattern.  Not knowing if the dress would be too small I used a 1/4" seam. I added a cute collar, boning at each seam, and turned it into a halter. After adding a zipper I realized the bodice is a little big at the bust (fits pretty good at the waist). I will had to go back and tighten at the zipper (as the collar is preventing me from tightening anywhere else without lots of seam ripping).

Lesson learned: make a muslin first and then use that as your new pattern.

I styled it with a 3/4 arm-length sweater from Target, cute wide white belt, and flats (not seen in this photo).

Now go try your hand at a pattern.

Thursday, April 18, 2013

3 Things I'm Obsessed With - April

Here are 3 thing I've been drooling over this month.

The trend of high/low shirts and dresses.  I know, I know it's a little 80's.  But I love how it makes your legs look just a little longer.  Here's a really fun one at ModCloth.

 1950's vintage style.  Nothing is more awesome than a dress that really shows off an hour glass figure.  A circle skirt dress cinches in at the waist and flares out to a create a beautiful shape.  I found an adorable one at French Connection.

 The color scheme of yellow and turquoise.  Such a happy color combination. (Be on the look out for these colors coming into my shop)


What are you in love with?  Let me know in a comment!

Monday, April 15, 2013

3D Felt Flower Art - Tutorial

I was inspired by artwork I found on Pintrest.

So I created a similar style artwork tutorial for you to make one yourself.

Supplies:
12x12 art canvas
About 1/2 yard fabric
About 1/2 - 1 yard felt
Hot glue and gun


First pick your background fabric and and canvas.  I used a 12x12 canvas and a gray and white chevron by Premier Prints.
 
Then cover the canvas using hot glue gun, I just wrapped the canvas front like a present.  Try to get all the wrinkles out of the fabric on the front.  But if you don't, no worries because it will mostly be covered with felt flower.
 
Now for the flower.
 
 I cut very simple petals out of cheap felt.  You can use wool if you like (it will look nicer). You can see from the photos what sizes the petals for the base were (appx. 4" x 5.75"). Cut 8 of this larger size.
 
Now simple squirt a line of glue at the bottom of the petal and pinch uniform pleats and hold until the glue has set (be careful not to burn yourself).
 Then find your center and place 2 petals like the photo above (leave about 1/2' in the center) and hot glue down.
 Next add 2 petals perpendicular to the horizontal petals, glue down.
Then add the 4 remaining petals like so, still leaving about 1/2" diameter circle in the center.
 
Now cut 8 medium petals at about 4.25" x 4.5". And do the pinch pleat.
Glue these directly on top of the larger petals in a circle leaving the center circle open.  It will look best if you make the medium petal points centered between the larger petals (see above.)
 
Now cut 4 small petals at about 3.25" x 4.5".  Pinch pleat and glue. Sorry no picture how to place, but just once again put on top of the previous petals, leaving a small open circle.
 
Now to make the tiny petals, make 3 at 3.25" x 3.25".  Pinch, pleat, and glue. Once again, no picture.  But with this one you want to kinda hide the edge of the center circle.  So as you glue, tuck the ends of the petals into the circle you left open...it will be really tight.  Just work it until it looks nice.
Now make one more petal but don't pleat.  Roll the petal and glue, like above.  I actually cut it down after this picture, so cut this petal at about 3.25" x 2".
Now with a dab of hot glue really shove that center petal into any space left in the center of the circle.  If really difficult, use the end of a pen to push it into the hole.
Fluff the petals until they look like you want.  Hang on the wall and enjoy your new 3D artwork!

Friday, April 12, 2013

Giveaway time!!

I have reached 1,000 views on my blog and in a little less than 1 month. As a thank you I will do a giveaway!!! 


If you would like a chance to win this adorable sunglasses clutch you need to "like" my Facebook page, I will have instruction there as to how to win.

InstaFriday April 8-12

This week was another rainy week in the Northwest.

On Monday the kids didn't think I need much sleep, this was my third cup.

Later that day I gave a sneak peak at the pin-up shoot that I did a few weeks ago.


On Tuesday my daughter and I went to Ikea to get a "few" items we forgot on Sunday.


On Wednesday I made a new necklace holder.  I just painted the frame to a cork board from Hobby Lobby and stuck clear push pins into cork.


On Thursday I made another quick craft with a orchid floral stem, burgundy ribbon, and cheap twig wreath from Joann's.  Everything is attached with hot glue.
 
 
Late Thursday (really late enough to be Friday) my wonderful husband hung the huge curtain rods in the living room.  Curtains are hemmed and ready to be hung.


Wednesday, April 10, 2013

What I wore Wednesday - Pink and Gray

Still rainy and chilly here in the Northwest.  I'm pretty much still in my winter wardrobe.


The dress is my favorite from Romy.  They cycle thru seasons quickly and no longer carry that dress.  But here is a new one that is very similar.

The sweater is a light pink cardigan from Target Merona brand.  Once again another store that only has the clothing for the season.  Here is a very similar one:


The scarf is from Old Navy last spring.  Target and Old Navy always have a great selection of scarves.  This one is a light jersey that I have tied in the back to create an infinity scarf.

 The belt is a skinny braided belt from Target; here's the link.

The boots are my favorite.  They are the Etienne Aigner Colton Riding Boot in Dark Chestnut.  The front is a brown leather while the back half of the boot is a heavy canvas in houndstooth print.  I bought them at Macy's, but they are sold out.  Here's a link to a place that still has them in stock. 

The leg warmers are a fun addition to the outfit that I found on an Etsy store, Grace and Lace.  Check them out, they have lots of great products.

Monday, April 8, 2013

Glitter Deer Silhouette - Tutorial

Glitter!!!

Did I get your attention?  This is an easy and fun craft project anybody at any craft level can make in just a few hours.

Supplies:
Stretch Canvas
Acrylic paint
Paint brushes
Pencil
Silhouette image
Fine glitter
Elmer's glue or mod podge

First you need a canvas.  I used a smaller 8x10" canvas.


Next pick a base color.  Since the canvas came in a pack of 2, I made one with turquoise and one with mustard yellow.  This is a photo of the turquoise after 2 coats of paint.  Don't forget to paint the sides of the canvas.


Next find a silhouette that you like.  Just search Google image for the silhouette.  Here's the one I used.

<SOURCE>

Blow the image up to as large as you want it to be on your canvas.  It does not matter how high the resolution of the image is because you just need the outline.

Then cut out the image (sorry no photo here, but you get the idea).

Then either use painters tape to tape the image to the painted canvas exactly where you want the silhouette to be placed.  Or if you're a little more experienced, you can simply hold the outline in place with your hand.  Now lightly trace the outside of your image with a pencil (you can see portions of my pencil outline in the following photo.)

To help the glitter stand out I painted the image a similar color to the glitter.  For the silver glitter I painted the deer gray (for gold I would recommend a yellow.)  I painted this with 2 coats of paint.


Next to add the glitter.  You could use mod podge, but that stuff is super expensive.  What I use is 70% Elmer's glue and 30% water (or 50/50 as other websites recommend, but that just takes to long for me to dry.)  To make this just squirt about a tsp of glue onto a plate and add a few drops of water.  Mix really well with a small paint brush.

Paint over the image with your glue mixture using a small paint brush (don't worry Elmer's is water soluble and cleans up just fine.)  Cover the entire image with the glue mixture.  If it's drying before you finish just add a few more drops of water to the glue.  This is very important because it will help guaranty even glitter distribution.  Once the entire image is covered in glue mixture then start sprinkling you glitter.  Cover all wet glue with glitter.  A great glitter to use is Martha Stewart's brand.

 Once the glue is dry then pour all the excess glitter onto a piece of paper.  Then funnel the extra glitter back into the container.  If you did happen to have some "bald" spots where the glitter did not stick you can still fix the painting.  Just paint a little glue mixture on the bald spots and repeat the glitter sprinkling process.

Happy glittering!! I would love to see your creations.  Just attach an image or link to one in your comment.


Wednesday, April 3, 2013

Destination Elopement

Are you planning a destination elopement? Not really sure what you should wear?  This Friday Fashion segment will discuss an amazing couple and what they wore.

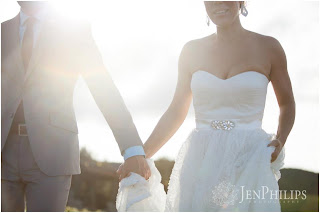
This beautiful, model-like couple are my sister and her new husband.  They eloped at Viansa Winery last week under stunning blue skies.  The location is picture perfect.  What a great idea to use a gorgeous location as your wedding backdrop.  Check out Viansa Winery's Facebook page here.

I'd also like to give a big shout out to Photography by Jen Philips for such stunning photos.  You can see her work here.


This dress is by Adrianna Papell at Nordstrom's (here is the link).  Nordstrom's didn't have the ivory version in the store.  They did have this dress in black, she was able to try it on, and then order online.  A ready-made dress is key for an elopement.  Most designer wedding gowns can easily take 4-6 months to be made.

Didn't you just die when you saw her shoes?  They are a wonderful pop of color and an easy way to make your wedding attire personal.  The shoes are the Lulu Townsend Valentine Pump in fuchsia at DSW (here is the link).
She picked up the earrings in a cute little boutique in Las Vegas a few years ago.  They are simple chandelier drop earrings that can be found in any local jewelry store. Here is a similar style.


 The handsome groom went with a gray slim fitting suit.  This suit can be purchased at any high end clothing store.  I found a great option at Nordstrom's.

<SOURCE>

As for the shirt, the groom is wearing the Ludlow spread-collar end-on-end shirt in frosted aqua at J.Crew.  
<SOURCE>

 Both the groom's necktie and socks are navy with pink polka dots to coordinate with the bride's pop of color.  The tie is from J.Crew.  While the socks are from Express.


<SOURCE> <SOURCE>

If you are planning a modern elopement remember you don't have to keep it simple, just make it your own.  Also don't forget go to a department store and ask if any of the dresses they carry come in white.