Showing posts with label Crafting. Show all posts

Friday, June 28, 2013

Finally hung my artwork

We are doing MAJOR remodeling in our house the next couple of weeks.   thought I should finally hang all my artwork I've been working on to create a turquoise and yellow bedroom (final picture of the room will come soon).

 The tutorial for the bird painting is here.

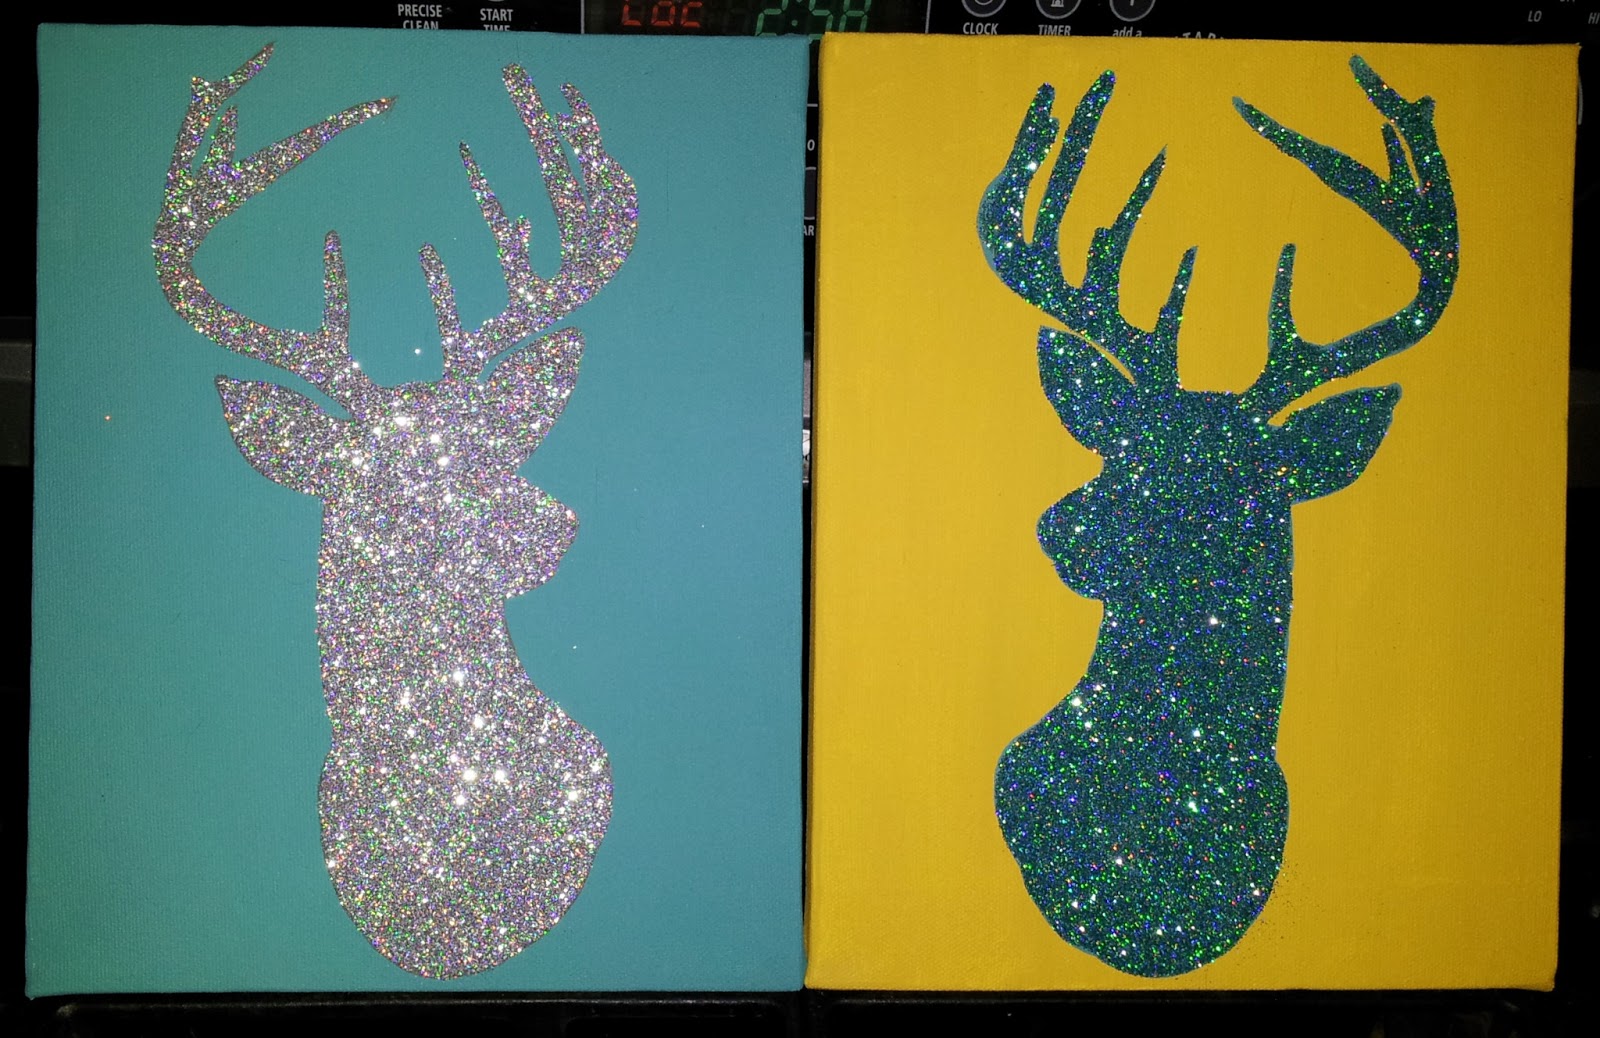
 The tutorial for the glittery deer is here.
 The tutorial for the 3D felt flower is here.
The paper mache letter "H" (from any hobby store) was simply painted yellow on the sides and scrapbook paper was glued to the top and cut out with an x-acto knife. 
Another easy one was this necklace holder. Simple purchase from any hobby store, paint the frame, and push in thumb tacks.

This was made using my dear friend Ayelet's tutorial over at the Graceful Rose.  The frame is from Ikea and I used premier prints Barber in yellow.  Since the print was super large scale and I wanted 2 birds, I actually cut one out from another area and appliqued it onto the fabric.

Friday, May 31, 2013

3 Things I'm Obsessed With - June

After a great week in Texas visiting family, friends, and attending a wedding I'm back to blogging in the Pacific NW.

Here are 3 things I'm obsessed with this month:

1. Running Costumes.  
I love the idea of take a well known costume and transforming it into an outfit you can run a race while wearing.  This blogger has been at it for sometime:


And what about these super socks?  Cheap on Amazon too!

2. Transforming a boring card table into something spectacular. 
Loving this color combination of deep coral and navy!

 <SOURCE>

 Here's a link to the fabric used on that chair.


 3. Sling bags.
They are great to use a markets bags or lugging all your summer essentials (sunblock, sunglasses, bottled water, etc)
Here's a great tutorial to make your own:


What are you obsessed with this month?

Monday, April 15, 2013

3D Felt Flower Art - Tutorial

I was inspired by artwork I found on Pintrest.

So I created a similar style artwork tutorial for you to make one yourself.

Supplies:
12x12 art canvas
About 1/2 yard fabric
About 1/2 - 1 yard felt
Hot glue and gun


First pick your background fabric and and canvas.  I used a 12x12 canvas and a gray and white chevron by Premier Prints.
 
Then cover the canvas using hot glue gun, I just wrapped the canvas front like a present.  Try to get all the wrinkles out of the fabric on the front.  But if you don't, no worries because it will mostly be covered with felt flower.
 
Now for the flower.
 
 I cut very simple petals out of cheap felt.  You can use wool if you like (it will look nicer). You can see from the photos what sizes the petals for the base were (appx. 4" x 5.75"). Cut 8 of this larger size.
 
Now simple squirt a line of glue at the bottom of the petal and pinch uniform pleats and hold until the glue has set (be careful not to burn yourself).
 Then find your center and place 2 petals like the photo above (leave about 1/2' in the center) and hot glue down.
 Next add 2 petals perpendicular to the horizontal petals, glue down.
Then add the 4 remaining petals like so, still leaving about 1/2" diameter circle in the center.
 
Now cut 8 medium petals at about 4.25" x 4.5". And do the pinch pleat.
Glue these directly on top of the larger petals in a circle leaving the center circle open.  It will look best if you make the medium petal points centered between the larger petals (see above.)
 
Now cut 4 small petals at about 3.25" x 4.5".  Pinch pleat and glue. Sorry no picture how to place, but just once again put on top of the previous petals, leaving a small open circle.
 
Now to make the tiny petals, make 3 at 3.25" x 3.25".  Pinch, pleat, and glue. Once again, no picture.  But with this one you want to kinda hide the edge of the center circle.  So as you glue, tuck the ends of the petals into the circle you left open...it will be really tight.  Just work it until it looks nice.
Now make one more petal but don't pleat.  Roll the petal and glue, like above.  I actually cut it down after this picture, so cut this petal at about 3.25" x 2".
Now with a dab of hot glue really shove that center petal into any space left in the center of the circle.  If really difficult, use the end of a pen to push it into the hole.
Fluff the petals until they look like you want.  Hang on the wall and enjoy your new 3D artwork!

Monday, April 8, 2013

Glitter Deer Silhouette - Tutorial

Glitter!!!

Did I get your attention?  This is an easy and fun craft project anybody at any craft level can make in just a few hours.

Supplies:
Stretch Canvas
Acrylic paint
Paint brushes
Pencil
Silhouette image
Fine glitter
Elmer's glue or mod podge

First you need a canvas.  I used a smaller 8x10" canvas.


Next pick a base color.  Since the canvas came in a pack of 2, I made one with turquoise and one with mustard yellow.  This is a photo of the turquoise after 2 coats of paint.  Don't forget to paint the sides of the canvas.


Next find a silhouette that you like.  Just search Google image for the silhouette.  Here's the one I used.

<SOURCE>

Blow the image up to as large as you want it to be on your canvas.  It does not matter how high the resolution of the image is because you just need the outline.

Then cut out the image (sorry no photo here, but you get the idea).

Then either use painters tape to tape the image to the painted canvas exactly where you want the silhouette to be placed.  Or if you're a little more experienced, you can simply hold the outline in place with your hand.  Now lightly trace the outside of your image with a pencil (you can see portions of my pencil outline in the following photo.)

To help the glitter stand out I painted the image a similar color to the glitter.  For the silver glitter I painted the deer gray (for gold I would recommend a yellow.)  I painted this with 2 coats of paint.


Next to add the glitter.  You could use mod podge, but that stuff is super expensive.  What I use is 70% Elmer's glue and 30% water (or 50/50 as other websites recommend, but that just takes to long for me to dry.)  To make this just squirt about a tsp of glue onto a plate and add a few drops of water.  Mix really well with a small paint brush.

Paint over the image with your glue mixture using a small paint brush (don't worry Elmer's is water soluble and cleans up just fine.)  Cover the entire image with the glue mixture.  If it's drying before you finish just add a few more drops of water to the glue.  This is very important because it will help guaranty even glitter distribution.  Once the entire image is covered in glue mixture then start sprinkling you glitter.  Cover all wet glue with glitter.  A great glitter to use is Martha Stewart's brand.

 Once the glue is dry then pour all the excess glitter onto a piece of paper.  Then funnel the extra glitter back into the container.  If you did happen to have some "bald" spots where the glitter did not stick you can still fix the painting.  Just paint a little glue mixture on the bald spots and repeat the glitter sprinkling process.

Happy glittering!! I would love to see your creations.  Just attach an image or link to one in your comment.


Monday, April 1, 2013

Put a Bird on It

What a great Easter weekend here in the Northwest!  All this sun makes me want to paint something with a bird on it.  

I was at a 12 hour craft retreat on Saturday and even though I should have napped kid-free the entire time....I crafted, went on a quick shopping trip, sewed the bodice to a dress, and did my taxes.  It's insane what you can get done without a couple children begging you to put the glue gun down.

First I started with a 16" x 20" blank canvas.  Here is the pack of 2 I bought and had shipped directly to my house (thank you Amazon!)


Then I painted the entire canvas with a mustard yellow acrylic.  I put down 3 coats, waiting until each previous layer of paint was dry (if you don't, when you paint over the wet spots the paint stroke will remove the wet paint).
This is after only 1 coat.
Now to start the fun part.  I found these awesome Martha Stewart stencils.

 First I carefully cut out the portion of the stencil I wanted to use.  I took a blob of white acrylic paint and added my mustard until I liked the color.  Then I took a stencil sponge and just dabbed a little paint onto it (if you add too much it will smear the detail of the stencil).  I did not tape the stencil down since I would be constantly moving it along the canvas.

I placed the stencil in the upper left hand corner and held with my non-stencil dabbing hand.  Next I gently tapped the sponge vertically into all the design holes, reloading the sponge when needed.  After all the holes were painted I carefully pulled the stencil away from the canvas.  Then I just moved the stencil down to the next location.  For the second row I started in the center and centered my stencil with 2 from the first line. I continued from there trying to just eyeball the placement.
It sure was pretty, but I felt it needed more.  Since I was in the spring mood I felt a bird on a branch should be added.

First I just free handed with light pencil strokes a branch outline.  Then I went over those lines with a cobblestone gray acrylic paint, increasing the thickness of the branch at the right side of the canvas.  I only needed 2 coats of this paint.  Don't stress, these are branches, even in nature they're not perfect.
Now to put the bird on it.  Since I was at a retreat I had access to a Cricut. I used the bird from this cartridge and increased the size to 6". 

If you don't have a Cricut you could just Google Image search for a bird silhouette.  Print out the image you like to a large scale.  Cut out the bird and trace with a pencil where you want it to sit.  Then fill in the image with a nice contrasting color.  

 I just used Elmer's glue on the back of the heavy cardstock and glued it on one of the branches.


Sunday, March 24, 2013

Wine Hammock...Yes Please

A few months back I went on a craft retreat.  As a gift I made all my friends wine glass holder necklaces, a hammock for your wine glass.

Now we could craft with both our hands while drinking our wine.  No more forgetting which wine glass is yours because its always around your neck!

I have finally began to offer these great items in my shop.  Check them out.

https://www.etsy.com/listing/126794446/wine-glass-necklacehammock-riley-blake